-->

Infinity Ads

Showing posts with label Cosmetics. Show all posts

Monday, March 10, 2014

How to Get Brighter Looking Eyes: Bright Eyes Makeup Tutorial


The first thing that people remember about you are your eyes. Ironically, one of the hardest parts of the face to put makeup on are the eyes! In this tutorial, I will try to make it as simple as possible. Even if there are numerous steps in this tutorial, once you get the hang of it, it can be your everyday eye makeup since it's simple, subtle yet noticeable.
Here are the things that you will need first:
1. A small angled brush for the eyes (What I used: Marionaud Angled Brush)
2. Eyebrow kit or a matte eye shadow that matches the color of your eyes (What I used: In2it Eyebrow kit)
3. Moisturizer, eye cream, or primer (What I used: Garnier eye brightening roll-on)
4. Pressed powder (What I used: Careline pressed powder)
5. Black pen eyeliner (What I used: Elf Waterproof Pen Eyeliner)
6. Powder based white shimmery eye shadow (what I used: Nichido Pearl white eye shadow)
7. Cream based white shimmery eye shadow (what I used: Sakiraya Cream eyeshadow)
8. Liquid foundation, BB cream or Concealer (What I used: Etude House precious mineral BB cream, Mary Kay liquid foundation)
9. Mascara (what I used: Etude House Lash Perm Mascara)
10. White eyeliner pencil (what I used: Elf White Eyeliner pencil)

STEP 1: PRIME YOUR EYES

Prime your eyes by placing moisturizer, primer or an eye cream. This is to nourish the eyes and make them appear brighter and less tired before applying makeup. I am using Garnier Eye Brightening roll-on. The metal ball in the roll-on soothes my eyes and lessens the appearance of dark circles.

STEP 2: CONCEAL IMPERFECTIONS
Now, before putting all the kaartehans in your eyes, it's a good idea to conceal all the dark circles or blemishes. The first thing I did is putting a BB cream around the eye area to correct the colors and lessen the dark circles. Next, I used liquid foundation to dramatically lessen the dark circles and for better coverage. Third, I used a pressed powder with sponge and dabbed some of it under the eyes and on the eyelids to set the foundation and BB cream.

STEP 3: SHAPE YOUR EYEBROWS AND LINE YOUR EYES

This is also a crucial step since it gives definition to the eyes. First, using your angled brush, fill in your eyebrows with your eyebrow kit or eyeshadow. This is more natural looking that eyebrow pencil since it's hazy. I have really thin eyebrows and this step is very important to me. I'm going for the thick eyebrows look since it's more youthful looking that those thin, tapered ones. Next, using the angled brush and the same shade that you used to fill in your brows, line your eyes around as close to the water line as if you're using a pencil to draw around your eyes. Wing the angled brush a little to create a cat eye effect. You will achieve a move subdued shadow around the eyes. The last portion of this step is using your eyeliner. Carefully swipe the eyeliner pen and also wing it a little on the corners as shown above. Are you seeing the difference now? :-)

STEP 4: HIGHLIGHT AND CONTOUR
It's time for my favorite part! Now take your powdered white eyeshadow and place it near your tear ducts. This will instantly brighten up your eyes. Next, use your white eyeliner pencil and place it on your lower water line. This will make your eyes appear larger and youthful looking. Don't forget to exaggerate it a little near the tear ducts as well. Next step is optional. Using your eyebrow kit, choose a middle or a light brown shade and line the outer V of your eyes as shown above. Don't forget to blend it out so it will look more natural. Lastly, use the cream shimmery shadow and using your fingers, dab some on your brow bone as shown above. This will also instantly brighten up your eyes.

STEP 5: CURL YOUR EYELASHES

The last step is to curl your eyelashes and apply mascara. Curl your eyelashes first and then apply generous amounts of mascara (2-3 coatings will do). This will also help your eyes pop out. Also, don't forget to apply mascara on the bottom eyelashes.

Did you see the subtle difference? I hope you liked this tutorial and don't forget to share it to someone who wants brighter looking eyes.

Related Articles:


Enhanced by Zemanta

Thursday, March 6, 2014

Make Your Own Eye Shadow Color! Eye Shadow DIY Idea

Do you have old eye shadows or makeup palettes hanging around waiting to be disposed of? Well, worry no further because in this DIY, I will teach you how to create your own eye shadow color from your old ones.

Here's what you will need:


Materials:
Old eye shadow palette
Empty eye shadow container
An empty small container to mix your eye shadow

Procedure: 

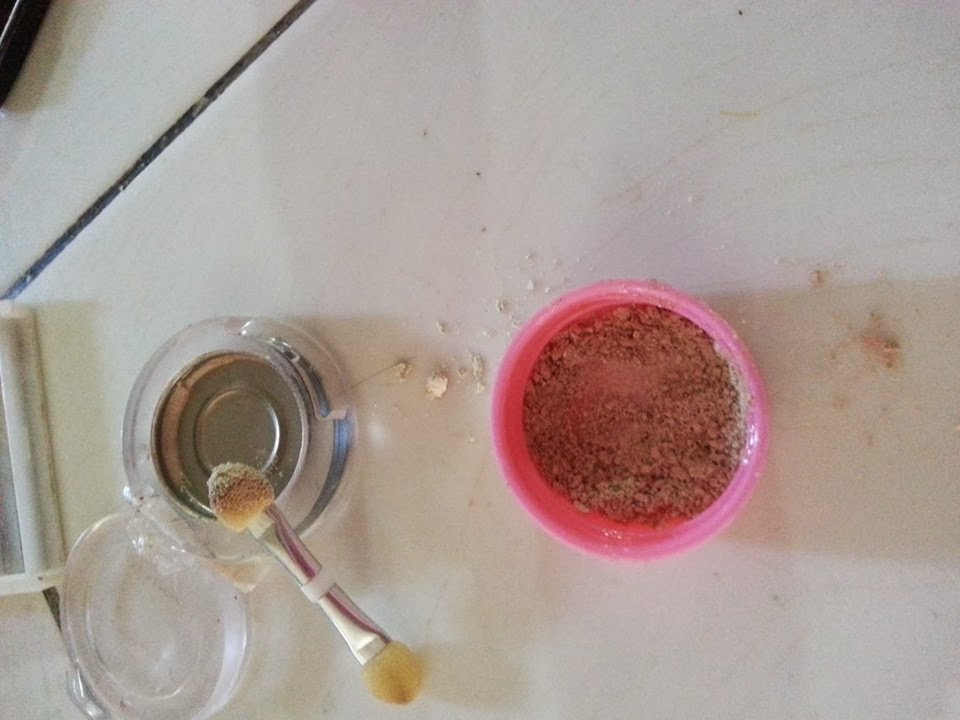
1. Remove all the eye shadow colors that you want to combine using an old eye shadow sponge or any small, hard tool. Place the eye shadow powders in one small container. Be sure to grind any solid or pressed powders that you see. Make sure all the powders are fine and even. I chose to mix my plain white eye shadow and the silver shimmery one for an extra glow.

2. Once you have placed all the eye shadow colors you have chosen, carefully mix the powder using the same tool that you used to remove the eye shadows from their original lids.

3. Add a little pinch (very very little) petroleum jelly in the powder mixture. This is just to hold the powder together once you will place them in the new lid. Mix again. This will form a slightly powdery paste that you can transfer on the new container.


4. Now transfer your new eye shadow on a small empty container and press it down to make it compact and to avoid spillages, like the one above. I realized that I used a broken eye shadow container so I need to re-transfer it. However, I already did a swatch sample in my hand, see? It has the shimmery look that I want in my eye shadow.


5. Now this is the actual finished product! I used an empty and fixed eye shadow container. Now it's ready to use and be placed in my makeup bag. It's not as perfect looking as your commercial eye shadows but it functions same as those you have. You can be more adventurous than me and try mixing other bold colors (think like you're making a new shade). I hope you like it and try it on your old eye shadows or palettes instead of throwing them away.

Related articles:

If you're not into much of these DIY stuff, I want you to try this one. I love ELF makeup products! They are very affordable and quality is superb. Baked eye shadows are better for me because they give a better, bolder color and the subtle shimmer will make your eyes glow. Check it out below.


Enhanced by Zemanta

Tuesday, February 4, 2014

The Real Deal About Eyelash Extensions: Yay or Nay?

Mine is not too long but the subtle difference is
noticeable :)
So I have heard a lot about eyelash extensions and it's becoming a widely known trend recently. Two of my friends from work tried it out and I decided to tag along and I can say that I'm generally satisfied with the results. I had mine done at Stylash Manila (they have two branches, SM BF Paranaque and Landmark Makati). So after having my extensions for a few days, here are some pros and cons that I have noted, let's start with the pros:

1. Your eyes will look bigger and noticeable feminine
The difference is very noticeable. Have you ever thought why you envy little children who have long lashes, it's because it's one of the first things that we notice in a person's face as we look at his/her eyes. Having long eyelashes will make you look more feminine and lesser makeup application for you since you don't need to put on mascara to lengthen your lashes.

2. You eyes will appear brighter and younger-looking even without makeup on
Do your eyes look tired when you don't have makeup on (concealer and such?) then extensions are for you since eyelashes make your eyes look more "open" and hides the sleepy eyelid creases.

3. No need to put on mascara
Which means lesser time doing your makeup (and therefore, more efficiency). Need I say more? It's also optional to put on eyeliner since the thick eyelashes also somehow lines the edges of your eyes.

Having said the pros, I will now discuss the cons of eyelash extensions.

1. You need to be extra careful with your eyes from now on
You cannot just rub your eyes if you feel like it. I know most of us don't do that when we have makeup on but it's even harder since you can't do it even without makeup.

2. It's somewhat difficult to manage taking a bath
The eyelashes accumulate water and if you close your eyes some water droplets get into the eyes. You cant just rub or wipe your eyes and you have to do it carefully.

3. There are lots of restrictions and maintenance is needed
You can't be in a steam room, sauna, jacuzzi, or any steamed/humid environment as this weakens the glue in your eyelash extensions. Oil-based makeup removers are also not recommended. You also have to do regular maintenance (refills of those lashes that wore off) if you want to keep them.

One of Stylash's pretty interiors! I can relate to the 1st wall picture since the whole process
of eyelash extensions are pretty tiring (both to me and the cosmetologist).
Having said all of those, I think having eyelash extensions are worth a try (even once) since I am really pleased with the results. The only fallback of this trend is the high maintenance that comes with it. Perhaps someday they should invent a technology where eyelash extensions are easier to maintain and lasts longer? Have fun with your eyelash extensions!

Visit Stylash Manila's Facebook Page: http://facebook.com/stylashmanila


Enhanced by Zemanta

Monday, September 30, 2013

Hello Princess! Natural Everyday Makeup Tutorial


Do you want an everyday look that can be done in under 15 minutes with a natural looking finish? Noticeable dewy skin, bright eyes and supple lips, but subtlety are the key elements of this tutorial. I'm a big fan of Etude House products ever since I hauled most of them when I was just looking for a good BB cream. I eventually liked all of the products I bought. I named this tutorial "Hello Princess" because the products I use for everyday makeup are from Etude House and that's how they greet customers when girls go inside their store outlets. I will show you step by step how I do my makeup everyday, and though I don't necessarily require you to buy Etude House for this tutorial, I highly recommend it to achieve this look. Let's get started! (pardon the wet hair as I just took a bath before starting on this tutorial haha!)


These are the products that you need (SEE BELOW POST ON WHERE TO GET SOME OF THESE PRODUCTS) :)
1. Moisturizer with SPF - What I used (Celeteque SPF15 Moisturizer)
2. BB Cream or Concealer - What I used (Etude House BB Cream Cotton Fit)
3. Eyebrow pencil or Eyebrow powder - What I used (In2it Waterproof Eyebrow powder)
4. Liquid Eyeliner - What I used (Nichido Pen Eyeliner)
5. Black pencil eyeliner - What I used (Careline Black Eyeliner)
6. Mascara - What I used (Etude House Lash Perm Mascara)
7. Highlighter or White/Cream shimmer eyeshadow - What I used (Etude House Look at My Eyes Vanilla)
8. Cream blush - What I used (Etude House Water Color Blush No.2 Coral)
9. Foundation powder - What I used (Nichido Foundation)
10. Loose Powder - What I used (Lewis and Pearl Loose face powder)
11. Makeup brush
12. Eyelash curler - What I used (Nichido Eyelash curler)
13. Lip gloss - What I used (Etude House Juicy Pop Tube red)

STEP 1: MOISTURIZE YOUR FACE
Moisturize your face as shown above, placing small dabs of moisturizer on the four corners of your face. Be gentle while spreading the moisturizer especially on the undereye area, if you can, apply the products by tapping your fingers.

STEP 2: FILL IN YOUR EYEBROWS
For me, this is an important step because I have very thin (almost invisible eyebrows). Your overall look is greatly affected by your eyebrow shape and neglecting this step might alter the results. I suggest you use an eyebrow powder to achieve a natural look. If eyebrow powder is not available, do use an eyebrow pencil with a shade that matches your hair color. It's important to follow the natural arch of your eyebrow. If possible, try to make it a little bit thicker and less arched as this will make your face more younger looking, sweet and innocent.

STEP 3: APPLY BB CREAM OR CONCEALER
I don't do total coverage of BB creams, foundations and concealers as my skin tends to be very oily during the day. I only apply a small dab on the areas shown above: a little on my forehead, under my eyes, on the sides of my nose and the area under my upper lip. You can also dab on scars, pimples and other problem areas. If it's possible, try to lightly tap using your fingers to spread the BB cream to minimize stretching and prevention of fine lines.

STEP 4: SET YOUR BB CREAM / CONCEALER / FOUNDATION

To prevent smudging of your BB cream, it is important to set it using a cake foundation. Set your BB cream using a sponge or a brush and dab / swipe around the areas where you placed your BB cream. Make sure that your powder is evenly distributed.

STEP 5: APPLY CREAM BLUSH
Next is to apply your cream blush. Dab a small amount on the apples of your cheeks and spread evenly. Remember not to apply to heavily, just enough to give the effect of subtle rosy cheeks. It's also important to pick a color that is not too pink but not too dark. Choose a blush that is the same color of your cheeks when you are blushing.

STEP 6: APPLY HIGHLIGHTER OR WHITE / CREAM EYE SHADOW
This is my favorite part because applying this highlighter makes a big difference to my overall look. Using your middle finger or ring finger, subtly apply the white shimmer powder on the areas I highlighted above. Bridge of the nose, your philtrum (small dent on top of your lips), sides of cheeks (not the apple of cheeks), eye brow bone, tear ducts, sides of your nose near the eyes and lower lash line. These are basically the high points of your face and highlighting these high points will enhance your face and make it brighter and younger looking.

STEP 7: SET YOUR OVERALL MAKEUP WITH LOOSE POWDER

Applying this will set your blush and highlighter in place and will reduce overall shine later on. Place a moderate amount on your hands (or if you have a container, better) dab your makeup brush and swipe it all over your face and neck. Make sure that the powder is evenly applied.

STEP 8: APPLY LIQUID EYELINER

This is a challenging part because I succeeded using a pen or liquid eyeliner through frequent practice over time. I can also say that I'm not an expert in doing so. But doing this step greatly enhances your eyes as it will make your eyelashes look more defined which results to bigger looking eyes. The trick in applying a a liquid liner is start halfway outward, then work on the inner half last. Be sure to wing it out a little, but not too much. Make sure that the wing on the corner of the eye is upward to achieve a subtle cat eye effect.

STEP 9: APPLY EYELINER AT BOTTOM LASH LINE, CURL LASHES AND APPLY MASCARA
Once you're done with the upper lash line, work your way using your eyeliner pencil on the lower lash line. Be sure to fill in only 1/3 or halfway of the lower lashline and try to fade it out so it will look more natural. Don't put eyeliner on the whole lower lashline as it would appear too harsh. After this, curl your lashes and apply your favorite mascara.

STEP 10: APPLY LIP GLOSS
Congrats! This is the last step! Place a small amount of lip gloss on either your upper and lower lips and spread evenly. Make sure that the lip gloss doesn't spill over your lips, and apply just a little for that subtle tinted look.

VOILA! Enjoy your natural looking "Hello Princess" look.

If you want to use the products listed above, here are some of them:


Enhanced by Zemanta